
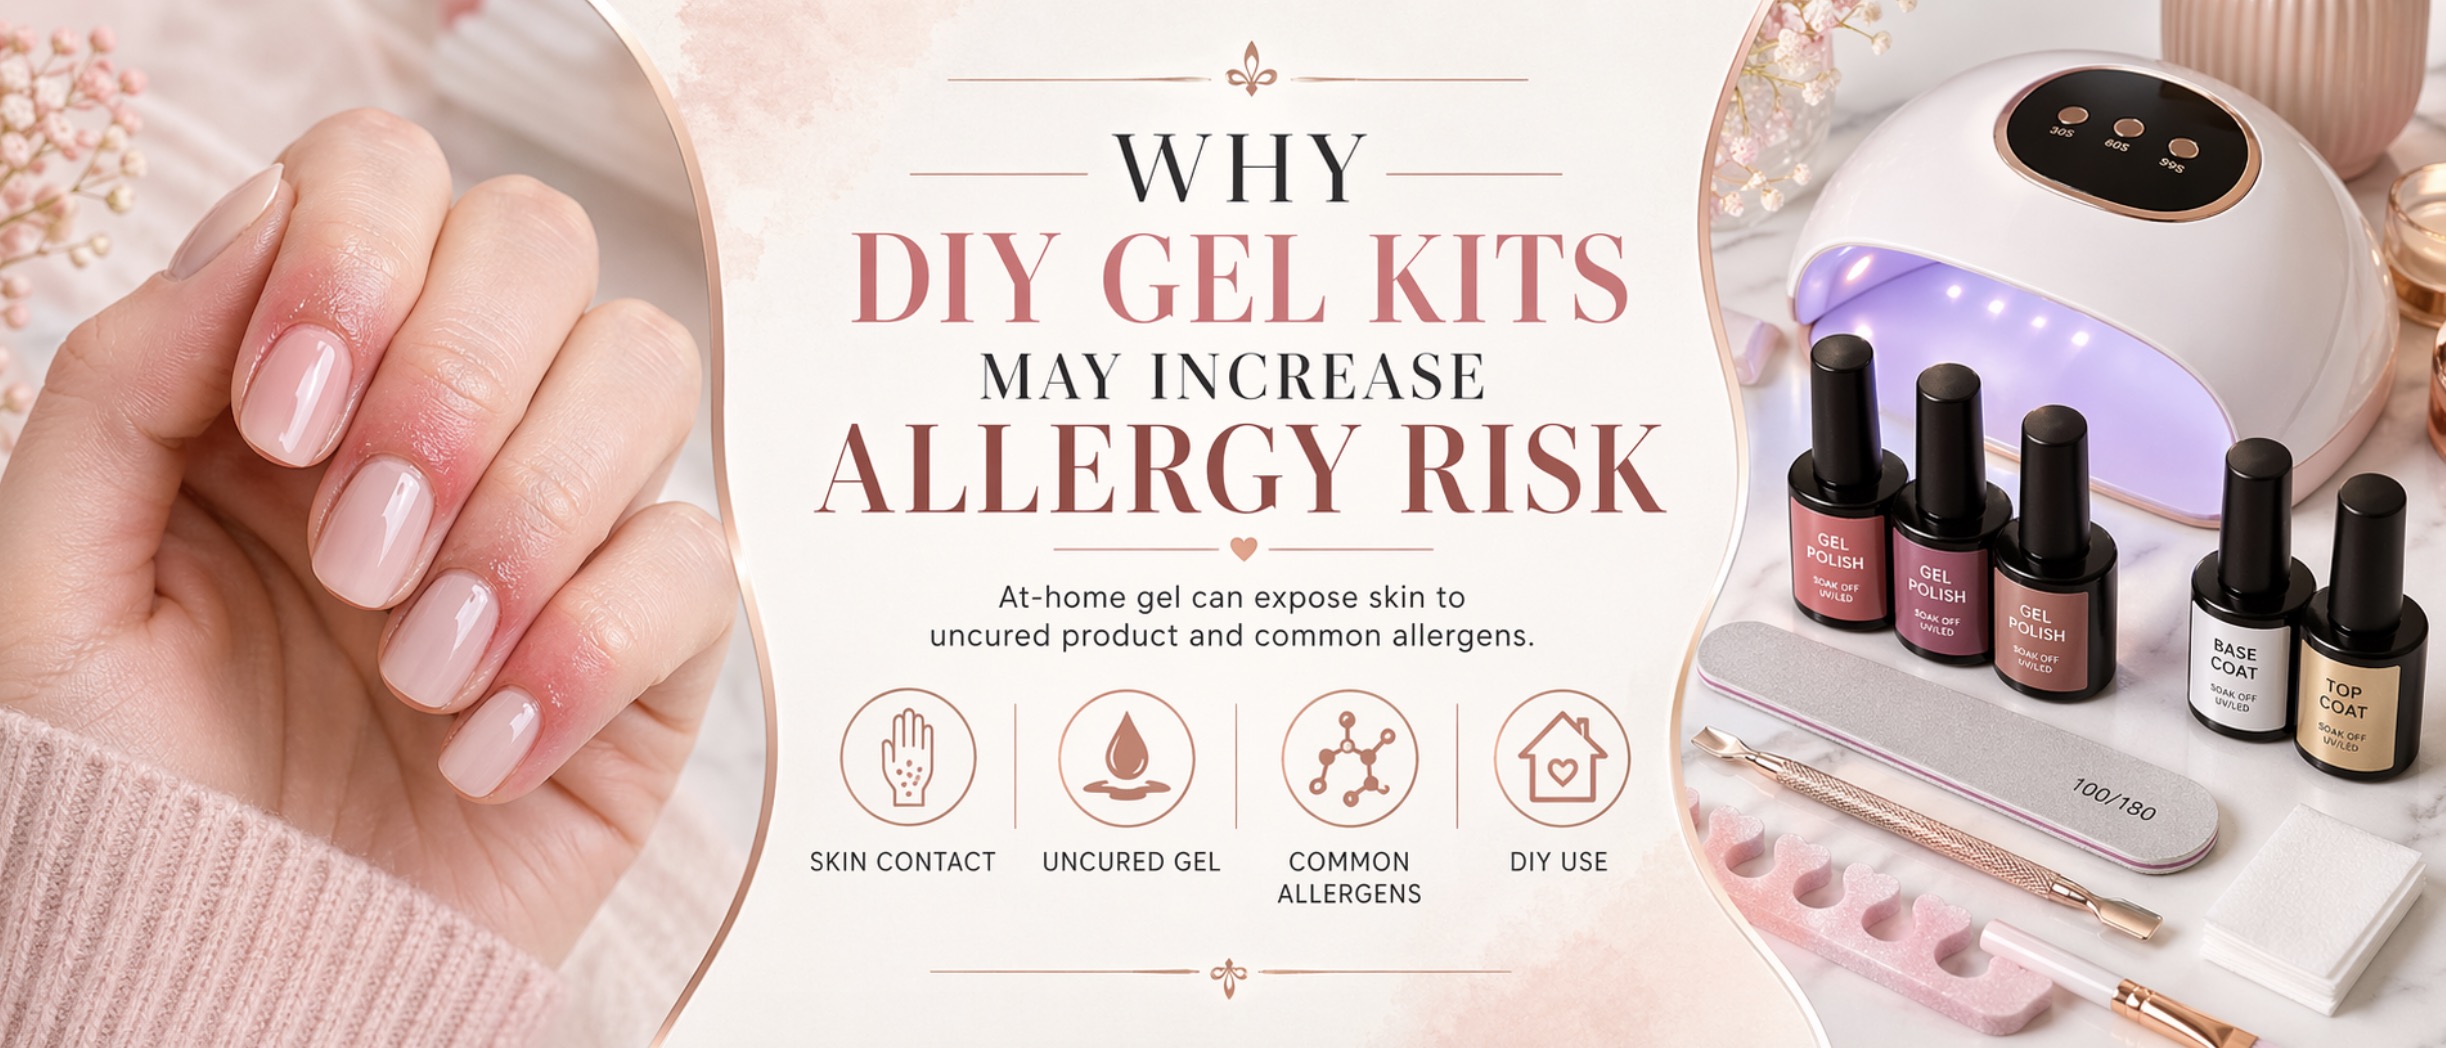
DIY gel kits can feel like the cutest little beauty hack ever. You get shiny nails, salon-looking color, and that satisfying “I did this myself” feeling without booking an appointment. But there is one not-so-glam detail every at-home nail lover should know: DIY gel kits may increase allergy risk when gel touches the skin, is under-cured, or is removed too aggressively.
This does not mean every gel kit is scary or that you need to throw away your nail lamp in a dramatic main-character moment. It means gel products need to be used carefully, because many gel systems contain reactive ingredients that are meant to cure fully under a compatible lamp. When those ingredients stay uncured or repeatedly touch your skin, your immune system can sometimes become sensitized. Once that happens, future gel manicures may trigger itching, redness, swelling, peeling, or rash.
If you love doing your nails at home, this guide will help you understand why DIY gel kits may increase allergy risk, what warning signs to watch for, and how to make your at-home manicure routine safer, cleaner, and way more nail-health-girlie approved.
Cute little essentials for a safer DIY gel routine
If you do gel nails at home, these are the kinds of products that can help you work cleaner, cure better, and remove gel more gently:
- HEMA-free gel polish options for sensitive-skin shoppers who want to compare formulas
- Professional UV LED nail lamps to help match gel products with proper curing power
- Gel cleanup brushes for removing product from skin before curing
- Lint-free nail wipes for cleaner prep and tacky-layer cleanup
- Gel nail removal kits to help avoid peeling, picking, and nail plate damage
Why DIY Gel Kits Are So Popular
At-home gel kits are popular because they make manicures feel easier, faster, and more affordable. You can do your nails at midnight in pajamas, choose your own color, fix a chip yourself, and skip salon scheduling completely. Honestly, the convenience is very tempting.
Most kits include gel polish, a base coat, a top coat, and a UV or LED lamp. Some also come with nail files, buffers, cuticle tools, primer, cleanser, lint-free wipes, and decorations. For beginners, that all-in-one setup feels super helpful.
The issue is that gel nails are not exactly the same as regular polish. Gel products cure through a chemical process under a lamp. That means the formula, lamp strength, cure time, application thickness, and skin contact all matter. When you are doing everything yourself without training, it is easier to make tiny mistakes that can raise allergy risk over time.

Beetles 15ml HEMA-Free Nail Glue Gel, TPO Free UV Nail Glue

Beetles HEMA-Free Builder Gel with Base and No Wipe Top Coat 3PCS 15ML
Makartt Milky Pink Gel Nail Polish: 15ML Hema-Free, Jelly Baby Pink

Dr. G's Clear Nail Antifungal Treatment, 0.5 Fluid Ounce
What Is a Gel Nail Allergy?
A gel nail allergy is usually a type of allergic contact dermatitis. That means your skin reacts after becoming sensitized to an ingredient in the nail product. Common triggers can include methacrylates and acrylates, which are used in many gel, acrylic, builder gel, Gel X, and nail glue products.
One ingredient people often talk about is HEMA, short for hydroxyethyl methacrylate. HEMA is used in many gel nail systems because it can help adhesion. But HEMA is also a known allergen for some people. That is why you will see so many HEMA-free gel polish kits being marketed to sensitive users.
However, and this is important, HEMA-free does not automatically mean allergy-proof. Other acrylates or methacrylates can still trigger reactions in some people. So the goal is not just choosing a trendy label. The goal is careful application, full curing, minimal skin contact, and knowing when to stop.
Why DIY Gel Kits May Increase Allergy Risk
DIY gel kits may increase allergy risk because beginners are more likely to get uncured gel on their skin, apply product too thickly, use the wrong lamp, under-cure gel, mix incompatible products, or peel product off during removal. Each of these mistakes can increase exposure to uncured or partially cured gel ingredients.
Your nail plate is not the same as the surrounding skin. Gel is meant to be applied to the nail, not the cuticle, sidewalls, fingertips, or under the nail. When gel repeatedly touches living skin, the risk of irritation or sensitization may go up.
Think of it like glitter glue for your immune system, except way less cute. A little accidental contact once may not cause a problem for everyone. But repeated exposure can teach the immune system to recognize certain ingredients as a threat. Once sensitization happens, future reactions may appear faster and stronger.
The Biggest Risk: Gel Touching Your Skin
The number one DIY mistake is flooding the cuticle or sidewalls with gel. This happens when polish is applied too close to the skin, too much product is loaded on the brush, or the hand moves before curing.
If gel gets on your skin and then cures under the lamp, it may stay in contact with the skin longer than it should. If gel gets under the cuticle area or along the sidewall, it can also cause lifting later, which creates another problem: moisture and debris can get trapped under the product.
Before curing, always inspect each nail. If gel touches your skin, clean it off completely with a small gel nail cleanup brush or lint-free wipe. Do not cure messy gel and tell yourself it will be fine. We are not doing denial manicures today.
Under-Curing: The Sneaky Problem
Under-curing means the gel looks finished on top but is not fully cured all the way through. This can happen if the lamp is too weak, the cure time is too short, the product is applied too thickly, or the lamp does not match the gel system.
Under-cured gel can leave more reactive ingredients available to touch the nail and surrounding skin. That may increase allergy risk, especially with repeated manicures.
A nail can look shiny and hard while still not being properly cured underneath. That is what makes under-curing so sneaky. You cannot always judge by appearance alone.
Why Lamp Compatibility Matters
Not every gel cures properly in every lamp. Different gel formulas may need specific wavelengths, curing times, and lamp power. This is why professional systems often recommend using the matching lamp from the same brand.
DIY kits sometimes include a small lamp, but not every mini lamp is ideal for every gel product. If you buy random gel polish from one brand, a base coat from another, and a lamp from another, you may not know whether everything cures properly together.
When shopping for a UV LED nail lamp for gel polish, look for clear wattage, full-hand coverage, timer settings, and compatibility information. Avoid guessing with tiny flash-cure lamps for full manicures unless the product instructions clearly support it.
Applying Gel Too Thickly
Thick gel layers may not cure as evenly as thin layers. This is especially true with highly pigmented colors, black gel, white gel, builder gel, and opaque shades. A thick coat can look smooth and glossy, but the lower layers may not fully cure if the lamp light cannot penetrate properly.
Thin coats are your bestie. Apply gel in thin, even layers and cure each layer according to the instructions. If you need more opacity, use two or three thin coats instead of one chunky coat. Chunky gel is not luxury. It is a curing risk wearing a shiny outfit.
Mixing Random Products Can Be Risky
It is so tempting to mix products from different brands. One base coat here, a random color there, a no-wipe top coat from another set, and a lamp you bought two years ago. Sometimes this works fine, but it can also make curing less predictable.
Gel systems are designed with certain formulas and curing requirements. When you mix products, you may not know whether the lamp fully cures each layer or whether the products are compatible. This does not mean you can never mix brands, but beginners should be extra cautious.
For a safer beginner setup, consider using one complete gel nail kit with lamp for beginners from the same system, then learn the basics before experimenting.
DIY Removal Can Damage the Nail Barrier
Allergy risk is not only about application. Removal matters too. Peeling, scraping, or ripping off gel can damage the nail plate and surrounding skin. Once your nail barrier is compromised, future product exposure may feel more irritating.
Improper removal can leave nails thin, sore, flaky, bendy, and sensitive. Then, when you apply gel again, the products may sting or irritate more easily. This is one reason repeated DIY gel cycles can become a problem.
Use a gentle removal routine with a soak-off nail clips, acetone wraps, or a proper gel removal kit. Do not force product off. If it is not ready, give it more time.
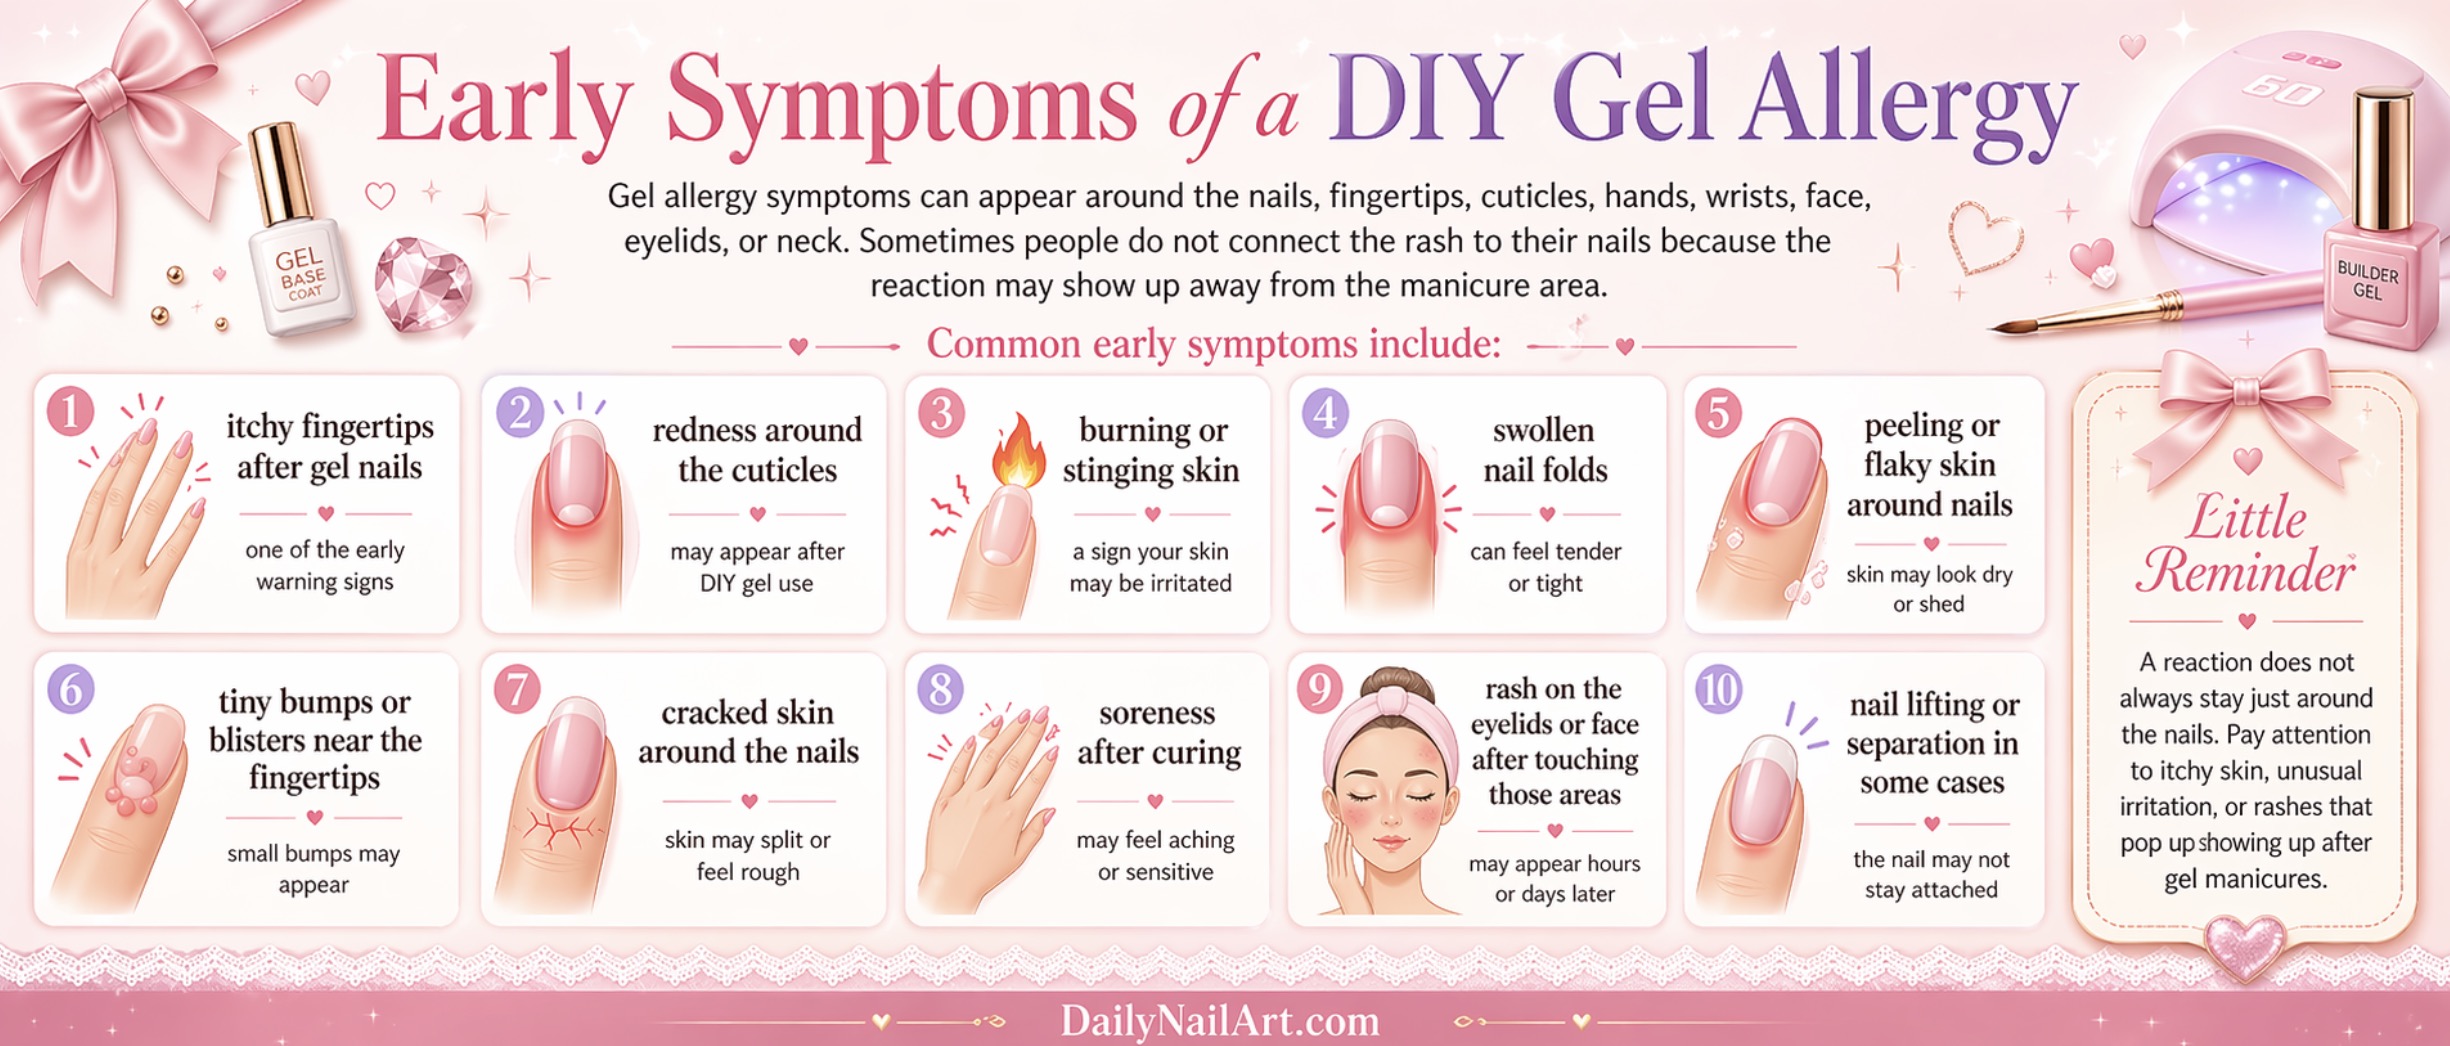
Early Symptoms of a DIY Gel Allergy
Gel allergy symptoms can appear around the nails, fingertips, cuticles, hands, wrists, face, eyelids, or neck. Sometimes people do not connect the rash to their nails because the reaction may show up away from the manicure area.
Common early symptoms include:
- itchy fingertips after gel nails
- redness around the cuticles
- burning or stinging skin
- swollen nail folds
- peeling or flaky skin around nails
- tiny bumps or blisters near the fingertips
- cracked skin around the nails
- soreness after curing
- rash on the eyelids or face after touching those areas
- nail lifting or separation in some cases
If symptoms happen every time you do gel nails, that is not something to ignore. Your skin is basically sending a tiny glitter-covered warning sign.
Can a Gel Allergy Start Suddenly?
Yes. You can use gel products many times with no obvious problem and then suddenly react. This is because allergic sensitization can build over time. The first few exposures may not cause noticeable symptoms, but eventually the immune system may start reacting.
This is why people often say, “But I have used this gel for months and was fine!” That can happen. Being fine before does not always mean you will be fine forever, especially with repeated skin exposure or under-cured product.
DIY Gel Kits and HEMA-Free Products
HEMA-free gel products are popular because HEMA is a common ingredient associated with gel nail allergy discussions. For some sensitive users, choosing HEMA-free may reduce exposure to one potential allergen. But HEMA-free is not the same as hypoallergenic, medical-grade, or guaranteed safe.
Other ingredients can still trigger reactions. Also, if the product is under-cured, applied to skin, or removed aggressively, irritation or allergy risk may still exist.
If you are shopping for HEMA-free gel nail polish, read product descriptions carefully, follow curing instructions, and stop using the product if symptoms appear.
How to Make DIY Gel Nails Safer
You cannot make gel nails completely risk-free, but you can reduce avoidable mistakes. A cleaner, more careful routine makes a big difference.
Keep Gel Off Your Skin
This is the big one. Leave a tiny margin around the cuticle and sidewalls. If product touches skin, clean it before curing. Do not cure messy edges.
Use Thin Coats
Apply thin, even layers so the lamp can cure the product properly. Avoid thick blobs, especially with dark or opaque colors.
Use a Compatible Lamp
Follow the gel brand’s lamp recommendations whenever possible. Make sure your lamp is not old, weak, or too small for proper curing.
Do Not Mix Too Many Systems
Beginners should keep base coat, color, top coat, and lamp as compatible as possible. Random mixing can make curing less predictable.
Do Not Peel Gel Off
Peeling gel can damage the nail plate. Use a proper soak-off method or see a professional for removal if needed.
Take Breaks If Nails Feel Sensitive
If your nails feel sore, thin, hot, itchy, or irritated, pause gel manicures. Do not keep layering product over stressed nails.
Beginner DIY Gel Safety Checklist
Use this little checklist before every at-home gel manicure:
- My hands and nails are clean and dry.
- I am not applying gel to broken or irritated skin.
- I am using thin coats, not thick layers.
- I cleaned gel off my cuticles and sidewalls before curing.
- I am using the correct cure time for each product.
- My lamp is compatible with my gel system.
- I am not mixing random products without checking instructions.
- I will remove gel gently instead of peeling it off.
- I will stop if I notice itching, swelling, rash, burning, or peeling.
What to Do If Your Fingers Itch After a DIY Gel Manicure
If your fingers itch after gel nails, take it seriously. Itching is one of the most common early warning signs of a possible reaction. Do not immediately do another gel set to “test it.” That can make things worse if your skin is becoming sensitized.
Remove the product safely if you can do so without damaging your nails. Avoid getting more gel on the skin. Wash hands gently, keep the area clean and dry, and avoid applying more nail products until symptoms settle.
If symptoms are intense, spreading, painful, blistering, or keep coming back, contact a dermatologist or healthcare professional. Patch testing may be needed to identify specific allergens.
When to Stop Using DIY Gel Kits
You should stop using DIY gel products if you notice repeated itching, redness, swelling, peeling, burning, blisters, nail lifting, or rash after manicures. You should also stop if gel products consistently sting on your nails or skin.
Continuing to use gel after symptoms appear can increase the chance of stronger reactions. It can also make it harder to figure out which product is causing the problem.
Sometimes the most responsible nail decision is taking a break and letting your skin calm down. Still cute. Very mature. Extremely main-character health era.
Should You See a Dermatologist?
Yes, especially if symptoms are recurring, severe, spreading, or affecting your face or eyelids. A dermatologist can help determine whether you are dealing with allergic contact dermatitis, irritant dermatitis, infection, eczema, or another issue.
Patch testing may help identify whether you react to HEMA, other acrylates, methacrylates, nail glue ingredients, preservatives, fragrances, or other substances. This matters because acrylates and methacrylates are also used outside nail products in some medical, dental, and adhesive materials.
This article is for informational purposes only and is not a diagnosis. If your skin is angry, painful, swollen, blistered, infected-looking, or not improving, please get professional medical advice.
Are Salon Gel Manicures Safer Than DIY Gel Kits?
A trained nail professional may reduce certain risks because they usually have better control, professional lamps, cleaner application technique, and experience with product systems. But salon gel manicures can still cause reactions if product touches skin, is under-cured, or if a person is already sensitized.
The safest option depends on the quality of the products, the skill of the person applying them, the lamp compatibility, hygiene, and your personal skin sensitivity. DIY does not automatically mean bad, and salon does not automatically mean perfect. Technique matters.
What About Gel Press-Ons and Gel X?
Gel press-ons, soft gel tips, and Gel X-style systems can also involve gel products, adhesives, or curing steps. If uncured gel glue touches your skin or floods the cuticle area, allergy risk may still be a concern.
When using full-cover tips, sizing is extra important. A tip that is too large can overlap skin. A tip that is too small can press into the sidewalls. Both can irritate the nail area and affect wear.
If you use soft gel extension kits for beginners, take your time with sizing, use minimal gel adhesive, avoid skin contact, and cure exactly as directed.
Safer Alternatives If You Are Sensitive to Gel
If gel products seem to irritate your skin, you may need to avoid them completely, especially if a dermatologist confirms an allergy. Some people switch to regular nail polish, non-gel press-ons with adhesive tabs, breathable-style lacquers, or bare-nail care while their skin recovers.
You can browse regular nail polish sets or press-on nails with adhesive tabs if you want a lower-commitment manicure option. Just remember that nail glue and adhesive tabs can also irritate some people, so pay attention to your skin with any product.
Common DIY Gel Mistakes That Increase Risk
Curing Gel That Is on the Skin
This is one of the biggest mistakes. Always clean the skin before the nail goes into the lamp.
Using Thick Coats
Thick coats can under-cure. Thin coats are safer, smoother, and usually prettier.
Using a Tiny Lamp for Full Sets
Mini lamps can be useful for flash curing, but they may not be ideal for fully curing every layer unless the product instructions say so.
Peeling Gel Off
Peeling damages the nail plate and can make future manicures more irritating.
Ignoring Itching
Itching is not just a quirky little side effect. It can be an early sign of allergy or irritation.
Doing Gel Over Damaged Skin
If your cuticles are cracked, bleeding, inflamed, or sore, wait. Gel should not be applied over irritated skin.
What Products Are Worth Having for Cleaner DIY Gel Manicures?
A few small tools can make your DIY gel routine cleaner and more controlled. A cleanup brush helps remove gel before curing. Lint-free wipes help avoid fuzz and residue. A good lamp helps with consistent curing. Soak-off supplies help you remove gel without peeling. Cuticle oil helps support the skin around your nails after removal.
You might also like looking at gel nail prep kits, nail dehydrator and primer sets, and cuticle oil pens if you are building a more complete at-home setup.
Just keep in mind that more products are not always better. Use only what you understand, follow instructions, and avoid layering too many unknown formulas together.
Frequently Asked Questions
Can DIY gel kits really cause allergies?
Yes, they can in some people. Allergy risk may increase when uncured gel touches the skin, gel is under-cured, products are used incorrectly, or exposure happens repeatedly.
Why do my fingers itch after using a gel nail kit?
Itching can be an early sign of irritation or allergic contact dermatitis. If it happens repeatedly after gel manicures, stop using the products and consider speaking with a dermatologist.
Is HEMA-free gel polish safe for everyone?
No. HEMA-free removes one commonly discussed ingredient, but other ingredients can still trigger reactions. HEMA-free does not mean allergy-proof.
Can under-cured gel cause a reaction?
Under-cured gel may leave more reactive ingredients available for skin contact, which can increase irritation or allergy risk. Proper lamp compatibility and cure time matter.
Should I stop doing gel nails if I get a rash?
Yes, pause gel nails if you develop itching, rash, swelling, blisters, peeling, or pain. Continuing exposure can make reactions worse if you are becoming sensitized.
Are regular nail polishes better if I am allergic to gel?
Regular polish may be a better option for some people with gel allergies, but it depends on the ingredients and your personal sensitivities. A dermatologist can help guide you if reactions continue.
Final Thoughts
DIY gel kits are convenient, fun, and totally capable of creating gorgeous manicures at home. But they also require more care than regular polish. Gel should stay on the nail, not the skin. It should be applied in thin coats, cured with a compatible lamp, and removed gently without peeling or scraping.
The biggest thing to remember is this: do not ignore itching, swelling, redness, peeling, burning, blisters, or rashes after gel nails. Your skin is giving you information, and listening early can help prevent bigger reactions later.
At-home nails can still be cute, glossy, and confidence-boosting. Just make your routine clean, careful, and skin-aware. Because the prettiest manicure is one that does not leave your fingers angry afterward.