
If your nail products have slowly taken over your desk, drawers, cart, closet, and maybe a tiny corner of your soul, you are absolutely not alone. Nail supplies multiply fast. One day you have a few gel colors and a file. Suddenly you have chrome powders, builder gels, nail art brushes, rhinestones, drill bits, tips, wipes, charms, lamps, and twelve almost-identical nude polishes that all feel emotionally necessary.
The good news is that organizing your nail products and tools does not have to feel like a giant stressful reset. With the right storage system, your nail area can feel cleaner, prettier, easier to use, and way more professional. Whether you are doing your own nails at home, building a home nail studio, or working with clients, organization can completely change your workflow.
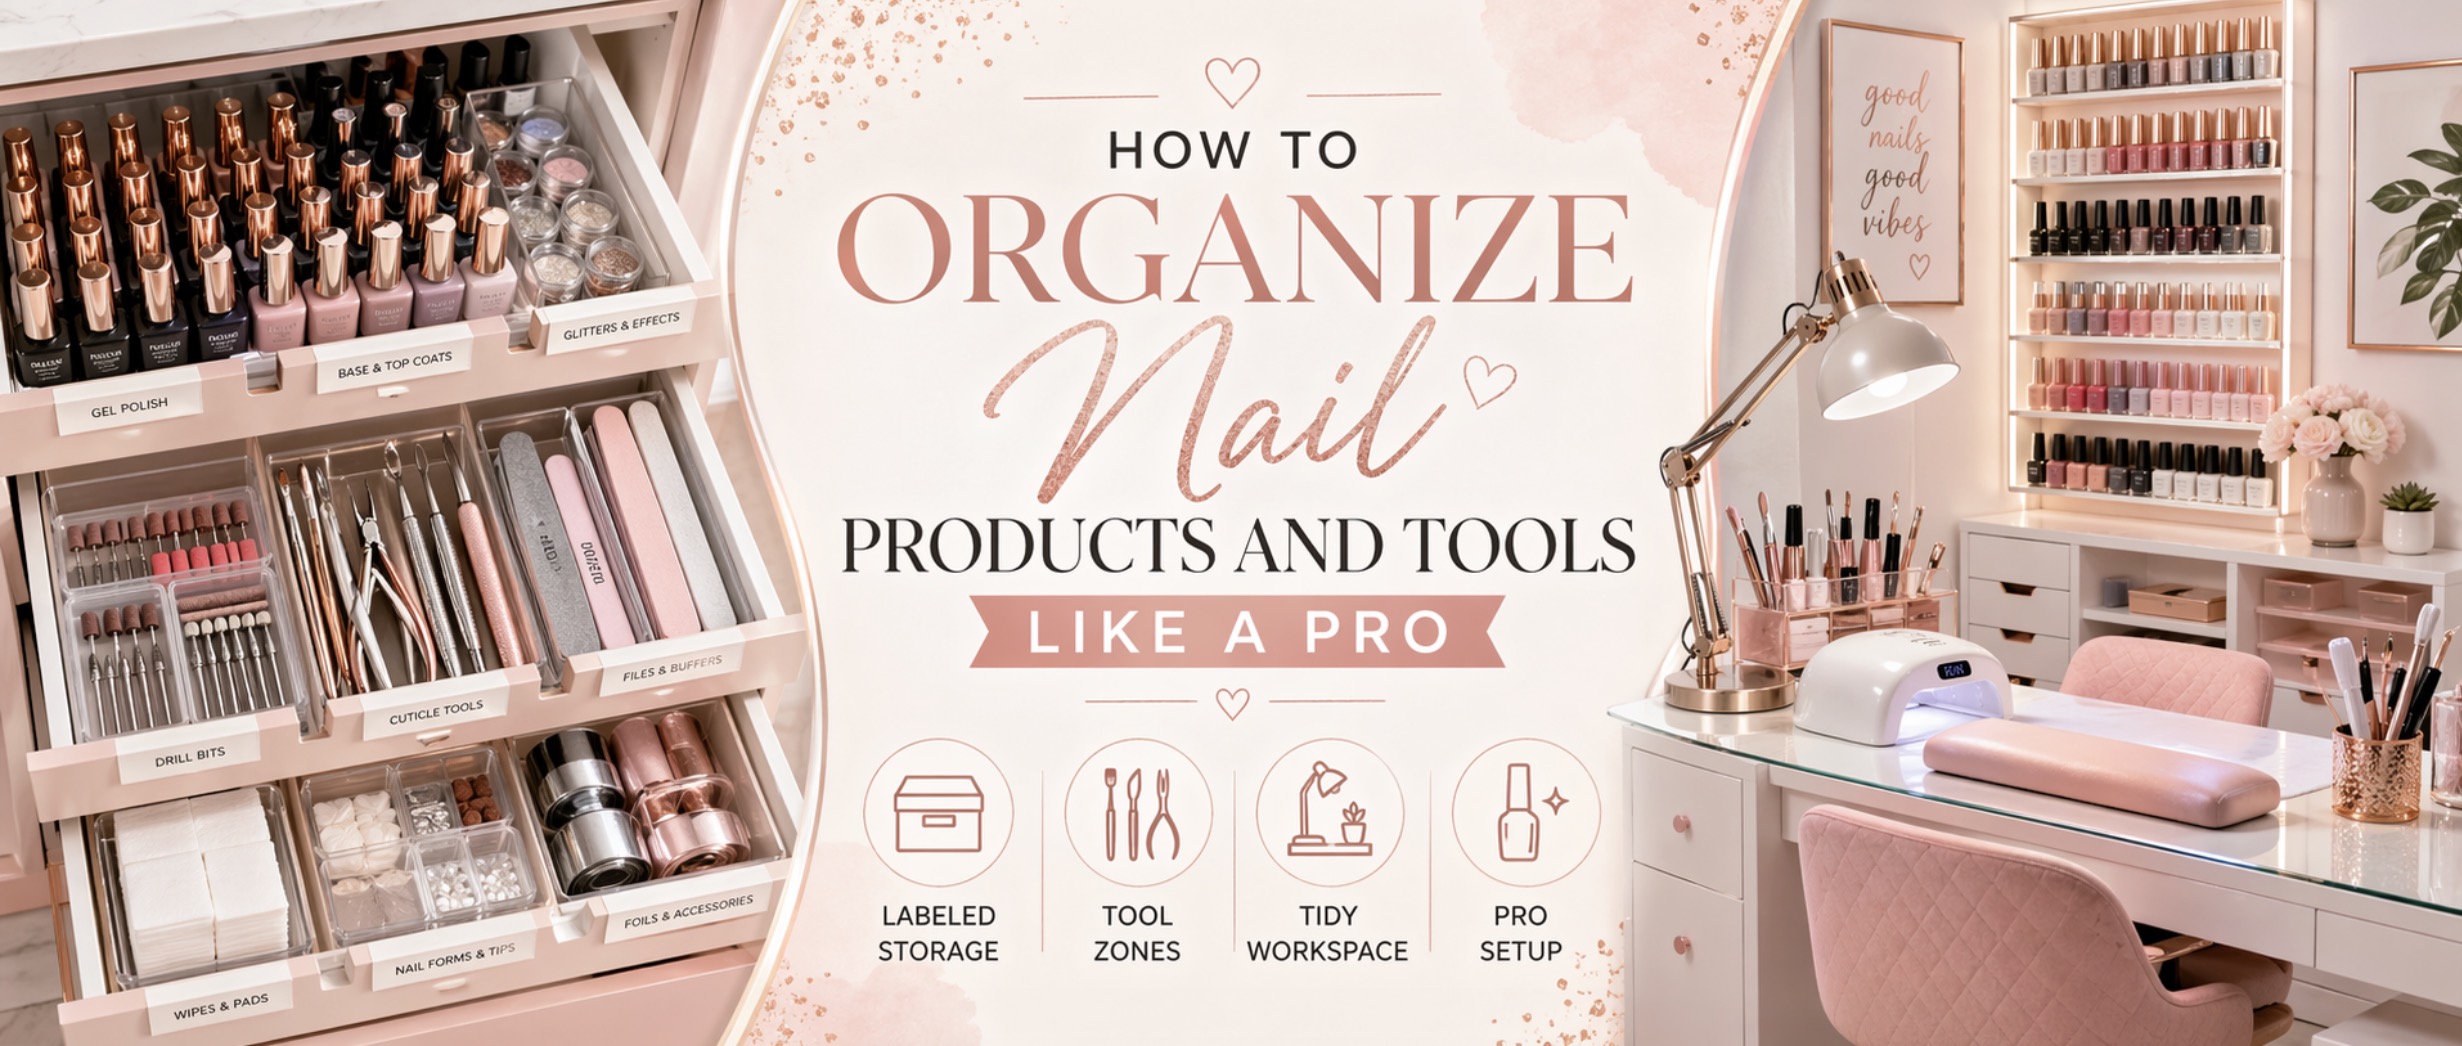
If you have been wondering how to organize nail products and tools like a pro, this guide is here to help you turn the chaos into a cute, functional, easy-to-maintain setup. We’re going to talk about organizing polish, tools, nail art supplies, drill bits, gels, files, wipes, carts, drawers, and everyday essentials in a way that feels practical and polished — not like you just shoved everything into a drawer and hoped for the best.
Cute little essentials for organizing your nail setup
If you want your nail products to feel easier to find, prettier to display, and way less chaotic, these are the kinds of storage pieces worth looking at first:
- Nail storage carts for keeping daily tools and products close by
- Wall-mounted nail polish racks for displaying colors without crowding your table
- Gel polish storage organizers for sorting shades, base coats, and top coats neatly
- Nail drill bit holders so your tiny e-file bits do not disappear into drawer chaos
- Nail art storage organizers for rhinestones, charms, stickers, chrome powders, and tiny details
Why Nail Organization Matters So Much
Organizing your nail products is not just about making everything look cute for photos. It actually makes your whole nail routine smoother. When your tools have a home and your products are easy to find, you spend less time digging through drawers and more time actually doing nails.
A good organization system helps you:
- work faster during manicures
- avoid buying duplicates you forgot you owned
- keep your workstation cleaner
- protect small tools and delicate products
- make your nail area feel more professional
- spot low supplies before you run out
Basically, organized nail supplies are not just prettier. They make your whole setup easier to use.
Error fetching products: HTTP 403 — {"__type":"com.amazon.paapi5#AccessDeniedException","Errors":[{"Code":"AccessDenied","Message":"Product Advertising API is deprecated. Please migrate to Creators API using the migration guide at https://affiliate-program.amazon.com/creatorsapi/docs/en-us/migrating-to-creatorsapi-from-paapi."}]}
Start by Sorting Everything Into Categories
Before buying organizers, sort what you already own. This is the step that makes the biggest difference because you cannot organize a pile if you do not know what is actually in it.
Start with categories like:
- gel polish colors
- base coats and top coats
- builder gels and acrylic products
- nail tools
- files and buffers
- nail art brushes
- rhinestones and charms
- chrome powders and pigments
- drill bits and sanding bands
- wipes, cotton, towels, and disposables
- aftercare products
Once everything is sorted, you will immediately see what kind of storage you actually need. Very responsible. Very satisfying.
Declutter Before You Organize
This is the part nobody wants to hear, but it matters. Do not organize products you already know you hate, never use, cannot identify, or probably should have thrown away three manicures ago.
Look for:
- dried-out polish
- old or separated products
- tools you never use
- duplicate colors you do not need
- broken containers
- random mystery nail art pieces
Decluttering first makes your final setup cleaner and easier to maintain. Organizing clutter is still clutter, just wearing a cuter outfit.
Create Zones in Your Nail Space
Professional-looking nail organization usually works because everything is divided into zones. Instead of storing products randomly, group them based on how you use them.
Helpful nail zones include:
- Prep zone: files, buffers, cuticle tools, wipes, cleanser
- Color zone: gel polish and regular polish
- Gel system zone: base coats, top coats, builder gel, primers
- Art zone: brushes, rhinestones, stickers, chrome, charms
- Removal zone: acetone, foils, soak-off clips, cotton
- Aftercare zone: cuticle oil, hand cream, nail strengtheners
This makes your setup feel intentional instead of random. It also makes it easier to reset your station after each manicure.
Use a Nail Storage Cart for Everyday Supplies
A rolling nail storage cart is one of the best organizing pieces for nail lovers, home studios, and small salons. It gives you flexible storage without crowding your desk.
You can use a cart for:
- daily prep products
- files and buffers
- gel base and top coats
- builder gel bottles
- lint-free wipes
- cuticle oil
- nail art supplies
- backup products
The best part is that you can roll it close while you work and move it aside when you need the room to feel clean again. Tiny-space magic.
Organize Gel Polish by Color Family
Gel polish is one of the easiest categories to make look pretty. Organizing by color family helps you find shades faster and makes your collection look more professional.
Try sorting by:
- nudes and beiges
- pinks and blush tones
- reds and berries
- whites and milky shades
- browns and neutrals
- blues and greens
- glitter and shimmer
- seasonal shades
A gel polish storage organizer or wall-mounted nail polish rack can make this look super clean and easy to browse.
Use Swatch Sticks or Color Charts
If your gel bottles are not easy to identify by looking at the outside, swatches are a must. Swatch sticks make your color collection way easier to use, especially if you have opaque bottles or similar shades.
You can organize swatches by:
- number
- brand
- color family
- season
- finish type
Looking through nail swatch sticks can be so helpful if you want your color selection to feel more salon-like and client-friendly.
Keep Base Coats, Top Coats, and Essentials Separate
Do not bury your most-used products among fifty color bottles. Base coat, top coat, primer, builder gel, dehydrator, and cleanser should be easy to grab every single time.
Create a small essentials tray or drawer with:
- base coat
- top coat
- primer if you use it
- dehydrator if you use it
- builder gel if used often
- cleanup brush
- lint-free wipes
This saves so much time because these products are part of almost every gel service.
Organize Nail Tools by Type
Your tools should be easy to find and easy to keep clean. Group similar tools together so you are not digging through a drawer full of metal pieces, brushes, files, and random caps.
Tool categories might include:
- cuticle pushers
- nippers and clippers
- cleanup brushes
- nail art brushes
- dotting tools
- tweezers
- scissors
A simple nail tool organizer can make your setup feel so much cleaner and more intentional.
Store Nail Art Brushes Upright or Protected
Nail art brushes are delicate little divas. If you throw them into a drawer with files and metal tools, the bristles can bend, fray, or get ruined.
Store brushes:
- upright in a brush holder
- flat in a protected case
- with caps on if they came with caps
- away from dust and sticky product residue
A nail art brush holder or brush case is such a small thing, but it helps your tools last longer and look prettier.
Use a Drill Bit Holder
Nail drill bits are tiny, sharp, and very easy to lose. Keeping them loose in a drawer is basically inviting chaos. A nail drill bit holder keeps them upright, visible, and easier to grab during services.
You can organize bits by purpose:
- cuticle work bits
- product removal bits
- ceramic bits
- carbide bits
- sanding bands
This makes your e-file setup feel much more professional and less like a tiny metal treasure hunt.

Organize Nail Art Supplies in Small Containers
Nail art supplies are adorable, but they get messy fast. Rhinestones, charms, stickers, foils, dried flowers, chrome powders, and glitters all need their own little homes.
A nail art storage organizer is perfect for keeping tiny details sorted.
Try organizing by type:
- rhinestones
- pearls
- charms
- stickers
- foils
- chrome powders
- glitter
- seasonal art pieces
Clear containers are especially helpful because you can see everything at a glance.
Keep Chrome Powders and Pigments Sealed
Chrome powders and pigments are gorgeous but messy. One tiny spill and suddenly your desk looks like a fairy exploded.
Store chrome powders:
- in their original jars
- inside a small container or drawer
- away from fans and open windows
- with applicators nearby
If you use them often, create a small chrome kit with powders, applicators, black gel if needed, no-wipe top coat, and a cleanup brush.
Give Files and Buffers Their Own Spot
Files and buffers should be stored cleanly and separated from delicate items like brushes and stickers. If you work on clients, keep hygiene and single-use practices in mind based on your local rules and professional standards.
For personal use, you can sort by grit or purpose:
- natural nail files
- enhancement files
- buffers
- mini files
- pedicure files
A drawer divider or small bin keeps them from scattering everywhere.
Create a Removal Kit
Removal supplies are easy to misplace, so keep them together. This makes soak-offs, press-on removal, gel removal, or acrylic removal way easier.
Your removal kit might include:
- acetone
- cotton pads
- foil wraps
- soak-off clips
- orange sticks or cuticle sticks
- buffer
- cuticle oil for afterward
You can browse gel nail remover kits or soak-off clips if you want to make this part of your setup cleaner and more convenient.
Keep Aftercare Products Easy to Reach
Cuticle oil, hand cream, and nail strengtheners should not be buried at the back of a drawer. These are the cute little finishing-touch products that make a manicure feel complete.
Create a small aftercare tray with:
- cuticle oil
- hand cream
- nail strengthener if you use it
- mini towels or wipes
This makes your final step feel more polished and client-ready.
Use Labels If Your Collection Is Growing
Labels are not just for hyper-organized people with matching pantries. They are incredibly helpful in a nail setup, especially once you have multiple drawers, bins, and product categories.
Label things like:
- prep tools
- gel color families
- nail art
- removal supplies
- drill bits
- backup stock
- client aftercare
Labels help you keep the system going after the first big organizing day.
Store Backup Products Separately
Backups are helpful, but they should not crowd your daily-use area. Keep extra files, wipes, gloves, polish, top coat, or refill products in a separate backup zone.
This keeps your main workstation clean and prevents that “why are there four unopened bottles on my desk?” feeling.
Keep Your Daily-Use Tray Small
A daily-use tray is perfect for the items you reach for every appointment or manicure. But do not let it become a dumping ground.
A good daily-use tray may include:
- base coat
- top coat
- cleanup brush
- cuticle oil
- lint-free wipes
- your most-used file
- small scissors or tweezers
Keep it cute, useful, and edited.
Organize by Workflow, Not Just Category
This is where organization starts feeling professional. Think about the order you actually use products during a manicure.
For example:
- prep tools should be near the beginning of your setup
- base and top coats should be very easy to reach
- gel colors should be easy to browse
- art supplies can be nearby but not crowding the table
- aftercare should be ready at the end
When your storage matches your workflow, your whole routine feels smoother.
How to Organize a Small Nail Desk
If your desk is tiny, focus on keeping the surface clear. Use drawers, wall racks, and carts for most products.
Small nail desk tips:
- keep only active products on top
- use a small tray for essentials
- mount polish on the wall if possible
- store tools in a nearby cart
- use vertical organizers
- avoid oversized decor
A small desk can still feel professional when it is organized well.
How to Organize a Nail Cart
A nail cart works best when each shelf has a purpose.
Example cart layout:
- Top shelf: daily-use products, base coat, top coat, prep liquids
- Middle shelf: gel colors, builder gels, nail art basics
- Bottom shelf: backups, towels, wipes, removal supplies
You can adjust this based on your routine, but the goal is to avoid turning every shelf into a random pile.
How to Keep Your Nail Setup Organized Long-Term
The real trick is not just organizing once. It is making the system easy enough to maintain.
Try these habits:
- reset your desk after every manicure
- put products back in the same zone
- declutter once a month
- keep backups separate
- do not buy organizers before sorting
- label categories if needed
- avoid keeping products you never use
A good system should feel easy to use, not like a strict little storage prison.
Common Nail Organization Mistakes
Buying Organizers Before Sorting
This usually leads to buying the wrong storage. Sort first, then shop.
Keeping Too Much on the Desk
A crowded desk makes every manicure feel more stressful.
Mixing Tiny Nail Art Pieces Together
Rhinestones, charms, and stickers need separate containers or they become a sparkly disaster.
Not Labeling Similar Products
If you have multiple gels, bases, or top coats, labels or swatches can save you from confusion.
Letting Backup Stock Take Over
Backups are useful, but they should not live in your daily work area.
Beginner Nail Organization Checklist
If you want a quick little starter list, here is what helps most:
- nail storage cart
- polish rack or organizer
- swatch sticks
- drawer dividers
- clear containers for nail art
- drill bit holder
- brush holder or case
- daily-use tray
- removal kit bin
- aftercare tray
- labels if needed
With those basics, your nail setup can go from messy and overwhelming to cute, clean, and very much giving “I have my life together.”
Frequently Asked Questions
What is the best way to organize nail products?
The best way is to sort products by category and workflow, then store them in zones for prep, color, gel systems, nail art, removal, and aftercare.
How should I organize gel polish?
Organize gel polish by color family, brand, or finish type, and use swatch sticks so you can see the true color before opening bottles.
What should I keep on my nail desk?
Keep only daily essentials on your desk, such as your lamp, arm rest, base coat, top coat, cleanup brush, wipes, and the products you are actively using.
How do I organize tiny nail art supplies?
Use small clear containers or divided organizers for rhinestones, charms, stickers, foils, chrome powders, and glitter so everything stays visible and separated.
How do I keep my nail area organized long-term?
Reset the desk after each manicure, keep products in their zones, declutter regularly, store backups separately, and avoid letting your daily-use area collect random extras.
Final Thoughts
Learning how to organize nail products and tools like a pro is really about creating a system that matches the way you actually do nails. You do not need a giant salon wall or a perfect beauty room. You just need clear zones, smart storage, and a routine that makes everything easy to find and easy to put away.
Start by sorting what you own, decluttering what you do not use, and choosing storage that fits your space. A nail cart, polish rack, drill bit holder, swatch sticks, and small nail art organizers can completely change how your setup feels.
Because honestly, there is something very satisfying about sitting down to do nails and realizing every tool, polish, brush, and tiny sparkly thing has its own cute little home.